

First, thank you for coming to my page to learn DIY Drywall Mudding. I’ve been doing drywall for many years now and I’m here to share my tips and tricks, as well as answer any questions you may have in the process.
My name is Joe, and I currently run this blog on the side of my business, Patch Pros Drywall Repair and Installation, in Upstate NY. I get a lot of jobs, and customers who are able to hang the drywall themselves but get tripped up during the mudding part. Customers are always happy to hear that I actually finish customer hung drywall, whereas most other companies simply will not due to the possible headache they may get. But let’s face it, if you aren’t getting a headache every once in a while then it’s not work. I’ve seen and finished drywall hung badly, but have also seen and finished drywall hung to near perfection. Either way, it can be done – and I’m going to do my best to help you!
DIY Drywall Mudding – Terms You Should Know
In order for you and I to be on the same page I want to make sure we each have the same terminology for DIY drywall mudding. First, I want to break down the different parts of the drywall you might be mudding. I say “might” because you may be researching DIY drywall mudding for a certain area, but also for doing a whole room.
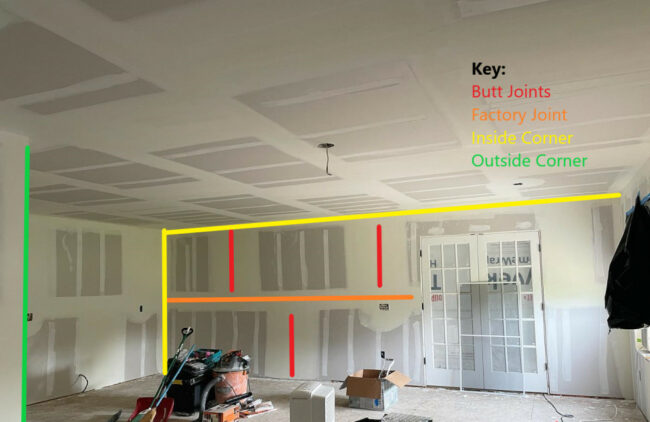
Factory Joints – the beveled/recessed end of the drywall
Butt Joints – where two ends of drywall meet
Inside Corners – a corner of a room
Outside Corners – an outside corner
Since you’ve researched DIY Drywall mudding, I’m going to assume you have already hung the drywall. I’m going to also assume that you have either hung the drywall horizontally or vertically. Either way will work, but as a fun fact, in residential builds it actually makes walls stronger to hang horizontally and with a stagger. It is always recommended to hang perpendicular to the framing of the wall/joists.
DIY Drywall Mudding – Tools You’ll Need
The main tools you’re going to need to begin your DIY Drywall Mudding project are drywall taping knives and a mud pan or a drywall hawk. If you’re a beginner, a mud pan is much easier to use. It is also a good idea to have your screwgun handy just in case you run into a drywall screw that wasn’t screwed in past the paper (it happens). There are many different brands of drywall knives out there that I support, and some actually sell by the set if you’re looking to save some money.
I recommend getting a 5” knife, a 6” knife, a 10” knife, and a 12” knife and a mud pan.
Right now, a top company in the drywall tool industry Level5 tools has a bundled discount on all of these products together. You can view the bundle here. I have had my same set for 3 years now, they have been worth every penny!
If you are looking for a budget set, below is highly recommended on Amazon.
As an Amazon Affiliate, I earn from qualifying purchases.
DIY Drywall Mudding – Products You’ll Need
The different types of joint compound on the shelves can be pretty confusing to a homeowner looking to start DIY Drywall mudding. There’s only a few I regularly use to get great results on my projects. Before you order your products, you need to gather an estimate on how much and which items you will need.
Drywall Tape
If you add up all of your seams(where two pieces of drywall meet UNLESS it will be an outside corner) that will give you your linear fit of drywall tape needed. Drywall tape comes in rolls of 250’ or 500’. Drywall tape will be used for butt joints, factory joints, and inside corners.
Outside Corner
In order to complete an outside corner, you will need either vinyl or metal corner bead. My preference is the vinyl as it can withstand a lot of pressure and will not fully damage the corner if it were to take damage. Whereas with a metal bead, if anything were to dent it – you would have to cut the metal bead out and replace it. Outside corners come in either 8’ or 10’ sizes.
Taping Joint Compound
For taping, I love using a thinned down USG All Purpose Joint compound (has a green lid). I thin out my mud using a little bit of water because it makes it a lot easier to work with, rather than straight out of the bucket.
Finishing Joint Compound
Finishing joint compound will be used for your 2nd and/or always your final coat. I use USG Lightweight (has a blue lid). I also prefer to thin this mud out as well to give my final coat a very smooth finish.
Sanding Blocks
Sanding blocks will be needed as this is the final step to your DIY Drywall mudding project. Once you have completed your final coat and allowed the compound to fully cure, you will need to sand any imperfections off of the surface.
Because all jobs are different, I cannot give an exact number of how much of these compounds you will need. As a general rule of thumb for myself, for every 1 all purpose compound I buy, I buy 2 finishing joint compounds (large 4.5 gallon containers).
DIY Drywall Mudding – Getting Started
When you first start your DIY Drywall Mudding project, you will first start using your 4” knife. The 4 inch knife will be for bedding the tape into the drywall seams. You will want to start go in this order:
1. Butt Joints
2. Factory Joints
3. Inside Corners
4. Outside Corners
For taping your joints, you will apply a thin coat of mud evenly over the joint first, remember to start with all of the butt joints in the room. Do one joint at a time. Next you will apply your drywall tape by lightly pressing it into the joint, and cutting it on the end using your 4” or 5″ knife to hold it, and your other hand to tear the tape away. Starting in the middle of the joint with your taping knife, you will now press the tape into the joint making it flat as possible, while removing any excess compound and placing it into your mud pan.
For Inside Corners, I’ve actually compiled a video to help you with this process from another part of my blog. More videos will be available soon!
Outside corners will require snips (unless your wall is exactly 8’ or 10’) to make it fit. You will be adding your all purpose compound to both sides of the outside corner, then pushing the vinyl or metal bead in. If you purchased a vinyl corner bead, you can either staple or screw it in (though it’s not required). If you purchased a metal corner bead, it has holes to screw drywall screws through to hold it in place.
Once you are done with taping, I recommend waiting overnight before applying a 2nd coat.
DIY Drywall Mudding – 2nd Coat
*Tip to save material, which saves you $$$*
If you have completed taping using your all purpose joint compound, you can actually use this to start your 2nd coat.
Your second coat will be done in the same order as before; butts, factory, inside, outside. For the second coat on the butt joints and factory joints, you should use your 10” taping knife. Now, using the mud in your drywall pan, you will want to get the mud onto the center of your knife, and apply it so the mud spread on the wall is roughly 10” this goes for butts, factory joints, and outside corners.
The difference here will be the inside corners, which I use a 4” or 5″ knife and coat the tape a 2nd time on each side of the wall.
DIY Drywall Mudding – 3rd Coat
If you haven’t already, now is the time to use the plus 3 finishing compound as this will make your sanding a lot easier. I should tell you that butt joints are a little bit different than factory joints because they do not have the bevel. In essence this means that butt joints need to be wider than factory joints in order to appear flat.
Using your 12” drywall knife, you will apply 1 coat of finishing compound to each side of the butt joint, making it a total of anywhere from 20”-24” wide. Only your butt joints will be this wide.
With the same knife, apply a thin coat on the factory seams. Your factory seams should be right around 12” wide. If you want sharp looking outside corners, I would use this knife on each side of the outside corner as well.
Using a 5” or 6″ knife, final coat the inside corners. Wait overnight (or sometimes longer) to make sure the mud is fully dry before sanding.
DIY Drywall Mudding – Sanding
To be 100% honest, sanding is my personal least favorite part due to the amount of dust that accumulates. Not just in the air, but all over my body. A lot of my tips here are really focused on wearing protection for this part. A lot of guys in the drywall trade share selfies in various groups of themselves looking like Marv from Home Alone 2. But that’s not me, I strongly believe in health first. Drywall dust is not something you should be inhaling daily and shouldn’t get into your eyes. So I highly recommend getting a good respirator/face mask designed to keep particulates out. I also recommend utilizing a good type of protection goggles/glasses (preferably ones that fit right to your face. And my final recommendation is to shower right after, drywall dust dries out your skin pretty fast!
Also, if you are highly concerned about the drywall dust, I personally use a vacuum drywall sander. It’s made to hook up to a shop vac and sucks the dust as you sand. It doesn’t eliminate all of the dust, but it definitely makes a big difference. If this is something you think would be worth it, this is the product I use.
I always sand my corners by hand, wearing protection, and keeping my shop vac on to help clear the air. The biggest thing about sanding is making sure the areas you mudded are blended into the bare drywall.
Any Questions?
Thank you for reading my article on DIY Drywall Mudding. If this guide left you with any questions, helped you in any way, or if you want to just say hi, please let me know in the comments below. I personally respond to any comments on my articles.
Thank you again, and best of luck on your drywall project!