Drywall Ceiling Repair Water Damage: DIY or Hire?
Discovering wet drywall on your ceiling can be a cause for concern, but fear not! In this comprehensive guide, we will provide you with a step-by-step process to effectively fix wet drywall and restore your walls to their former glory. And hey, if you decide it’s not for you, I have some great tips on hiring at the end. Plus as an added bonus, 5 questions you should ask your homeowners insurance company. Stay tuned!
Whether your ceiling repair was the result of a leaky roof, burst pipe, or flooding, taking immediate action is crucial to prevent further damage, mold growth, and costly repairs. By following these detailed instructions, you’ll be equipped with the knowledge and techniques necessary to tackle wet drywall like a pro.
Assess The Wet Drywall
The first step in fixing wet drywall is to assess the extent of the damage. Start by identifying the source of the moisture and ensuring that it has been resolved.
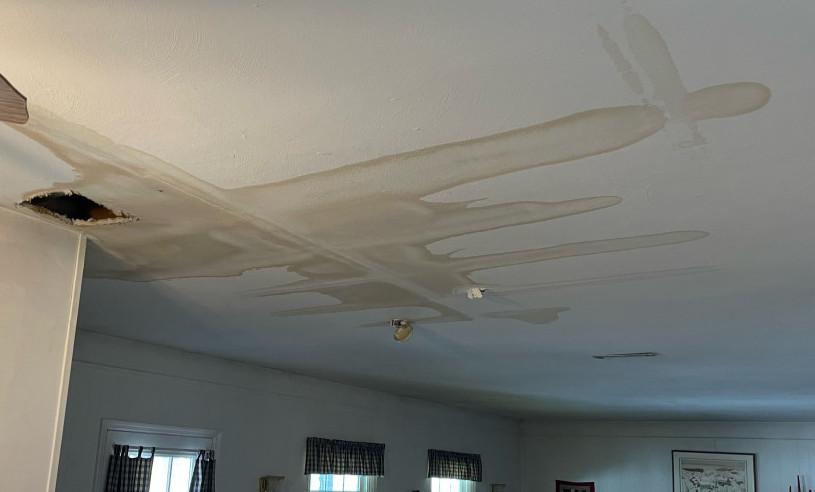
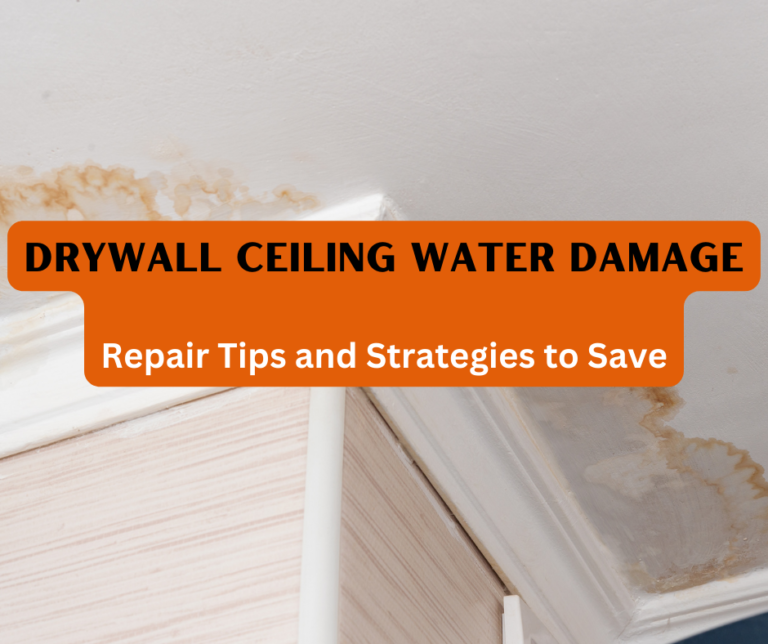
This specific job in the photo above was caused by a frozen pipe to the upstairs bathroom.
One thing you will notice is that whenever water comes through your ceiling like this, it will usually pool up at the tape seams of the drywall. It will also leave a gross looking stain on your ceiling.
Thoroughly inspect the affected area for signs of water saturation, discoloration, and visible mold growth. Take photos or videos of the damage for insurance purposes and make notes of the measurements required for replacement materials. This assessment will help you determine the scope of the repair and plan accordingly.
Safety Precautions
Before diving into the DIY repair process, prioritize your safety. Put on personal protective equipment (PPE) such as gloves, safety goggles, and a dust mask to protect yourself from potential hazards and allergens present in wet drywall and mold.
If wet drywall and mold doesn’t scare you enough to wear a mask, there could be fiberglass insulation or mouse droppings… not great things to breath in or touch!
Ensure proper ventilation by opening windows and using fans to circulate fresh air in the workspace. If you suspect extensive mold growth or are dealing with contaminated water, it may be necessary to consult a professional for safe remediation.
Remove The Wet Drywall
To fix wet drywall, remove the damaged sections. Start by cutting away around the affected area using a utility knife, drywall saw or oscillating tool. I personally use an oscillating tool for faster cuts.
Most of the drywall should come off very easily since it’s been wet. The ceiling drywall panels should come off fairly easy since it’s been saturated with water.
As you remove the wet parts, knowing the size of drywall panels will help you have a solid plan.
Remember that most drywall panels are 4×8, 4×10, or 4×12. If you’re able to remove the drywall in sections like that, re-installing the drywall will be much easier.
Make straight cuts along the existing drywall lines, ensuring clean edges. Be cautious when removing larger sections, as the drywall may become heavy and unstable. It’s essential to create a neat and precise opening for easier replacement.
After the wet drywall has been removed, remove any screws or nails in the stud and begin drying the area.
Dry the Area
Thoroughly drying the affected area is crucial to prevent further moisture damage and mold growth. Use dehumidifiers, fans, and open windows to promote air circulation and expedite the drying process. Consider using moisture meters to ensure the area is completely dry before proceeding with repairs.
Pay special attention to hidden areas behind the drywall, as they can retain moisture and lead to future problems. Allow sufficient time for the area to dry thoroughly, as rushing this step may result in residual moisture and compromised repairs.
Treat Mold and Mildew
Before taking on this step, know that treating mold and mildew can be harmful. If you don’t feel comfortable treating, I recommend hiring a local pro.
Address any mold or mildew growth promptly to protect your health and prevent its spread. Clean the affected areas with a mixture of water and bleach (1:10 ratio) or a commercial mold cleaner. Scrub gently and thoroughly, ensuring all visible mold is removed. For stubborn mold stains, consider using specialized mold stain removers. Allow the area to dry completely before proceeding. It’s important to note that if the mold infestation is extensive or if you have concerns about your health, it is advisable to consult a professional mold remediation specialist.
Repair and Patch Drywall
Now it’s time to repair and patch the drywall. Measure the dimensions of the removed sections and cut replacement pieces accordingly. Make sure to use the same thickness and type of drywall as the original. Install new drywall using screws or nails, ensuring a secure fit.
Start by attaching the replacement piece to the studs or existing drywall, ensuring it aligns with the surrounding surface. Use a level to check for accuracy. Secure the drywall in place by adding screws or nails approximately every 12 inches along the studs. Be careful not to overtighten, as this may damage the drywall.
To ensure a seamless repair, apply joint compound to cover the seams and create a smooth surface. Start by applying a thin layer of joint compound over the seams using a putty knife or trowel. Embed drywall tape into the compound, pressing it firmly to remove any air bubbles or wrinkles.
Apply another layer of joint compound over the tape, feathering the edges to blend with the surrounding area. Allow the compound to dry according to the manufacturer’s instructions, typically overnight. Sand the patched area with fine-grit sandpaper until it is smooth and even with the surrounding wall. Remove any dust or debris with a damp cloth or vacuum cleaner.
Sanding, Finishing, and Painting
Achieve a seamless finish by sanding the repaired area with fine-grit sandpaper. Start with a light touch and gradually increase pressure as needed to achieve a smooth surface. Be sure to feather the edges of the repair to blend it with the surrounding wall. Once the surface is smooth, wipe away any dust or debris with a damp cloth or vacuum cleaner.
Before painting, apply a primer to the repaired section to ensure an even finish and good paint adhesion. Use a brush or roller to apply the primer, following the manufacturer’s instructions. Allow the primer to dry completely before proceeding.
Finally, it’s time to paint the wall. Select a paint color that matches the existing wall, or consider repainting the entire room for a fresh look. Apply the paint using a brush or roller, working in even strokes and applying multiple thin coats for better coverage. Allow each coat to dry fully before applying the next. Once the paint is dry, step back and admire your beautifully restored walls.
Should I Hire A Drywall Contractor?
If you’re contemplating hiring a drywall contractor for repairing ceiling water damage, I would first check if your homeowners insurance covers it. On this specific job, the homeowner was covered from his insurance company.
Before tackling this project yourself, I’ve come up with 5 questions to ask your homeowners insurance company:
- If I open an insurance claim, how much do I have to pay out of pocket?
- What is included for the repair?
- Does my insurance cover painting the ceiling to match as well?
- Will it cover the plumbing repair/roof leak?
- Will this increase my premium for next year?
If you decide to hire a drywall contractor for this, I recommend getting at least 3 quotes for repairs. Let the drywall contractor know that this is an insurance claim, and they will be happy to assist. For quick quotes from drywall repair contractors visit HomeAdvisor.com
Conclusion
In conclusion, encountering wet drywall on your ceiling can be a worrisome situation, but with the guidance provided in this comprehensive guide, there’s no need to panic. Armed with a step-by-step process, you can effectively address wet drywall and restore your walls to their former condition. Whether the issue stems from a leaky roof, burst pipe, or flooding, immediate action is paramount to prevent further harm, such as mold growth and costly repairs.
Prioritizing safety at every stage, from donning protective gear to ensuring proper ventilation, is a crucial foundation for a successful repair endeavor. Removing the damaged sections of wet drywall, thorough drying, treating mold and mildew if necessary, and skillfully repairing and patching the drywall are essential steps that can make a significant difference in the final result.
Remember that consulting a professional for mold remediation or complex repairs is always an option if you’re uncomfortable with certain tasks. Additionally, if you’re considering hiring a drywall contractor, remember to check your homeowners insurance coverage, as this can potentially offset some of the costs. Asking pertinent questions to your insurance company can clarify the scope of coverage and potential out-of-pocket expenses.
Whether you choose to embark on the repair journey yourself or enlist the expertise of professionals, this guide equips you with valuable insights and actionable steps to address wet drywall effectively. With patience, attention to detail, and the information provided here, you can confidently restore your walls and ceilings to their former glory, creating a safe and aesthetically pleasing environment within your home.

