Drywall Ceiling Water Damage: Repair Tips and Strategies to Save
Water damage to drywall ceilings can be a major headache for homeowners. Not only is it unsightly, but it can also lead to costly repairs if not addressed promptly. In this article, we’ll provide tips and strategies for repairing drywall ceiling water damage in order to save money and prevent future damage.
Causes of Drywall Ceiling Water Damage
There are many potential causes of drywall ceiling water damage, including
- Leaking pipes or plumbing fixtures
- Roof leaks or damaged flashing
- Overflowing gutters or downspouts
- Condensation from poorly ventilated areas
- Flooding from natural disasters or accidents
It’s important to identify the source of the water damage in order to properly repair and prevent future issues.
Signs of Drywall Ceiling Water Damage
There are several signs that may indicate you have drywall ceiling water damage:
- Stains or discoloration on the ceiling
- Peeling or bubbling paint or wallpaper
- Sagging or bulging ceiling tiles
- Musty or moldy smells
- Visible water damage or puddles on the floor
If you notice any of these signs, it’s important to take action immediately in order to minimize the damage and prevent further issues.
Repairing Drywall Ceiling Water Damage
If you have drywall ceiling water damage, here are the steps you can take to repair it:
- Identify and fix the source of the water damage. This is the most important step, as you’ll need to stop the flow of water in order to effectively repair the damage.
- Remove any standing water or moisture. Use a wet/dry vacuum or mop to remove any standing water, and use a dehumidifier to remove excess moisture from the air.
- Dry out the affected area. Use fans and open windows to help dry out the affected area and prevent mold growth.
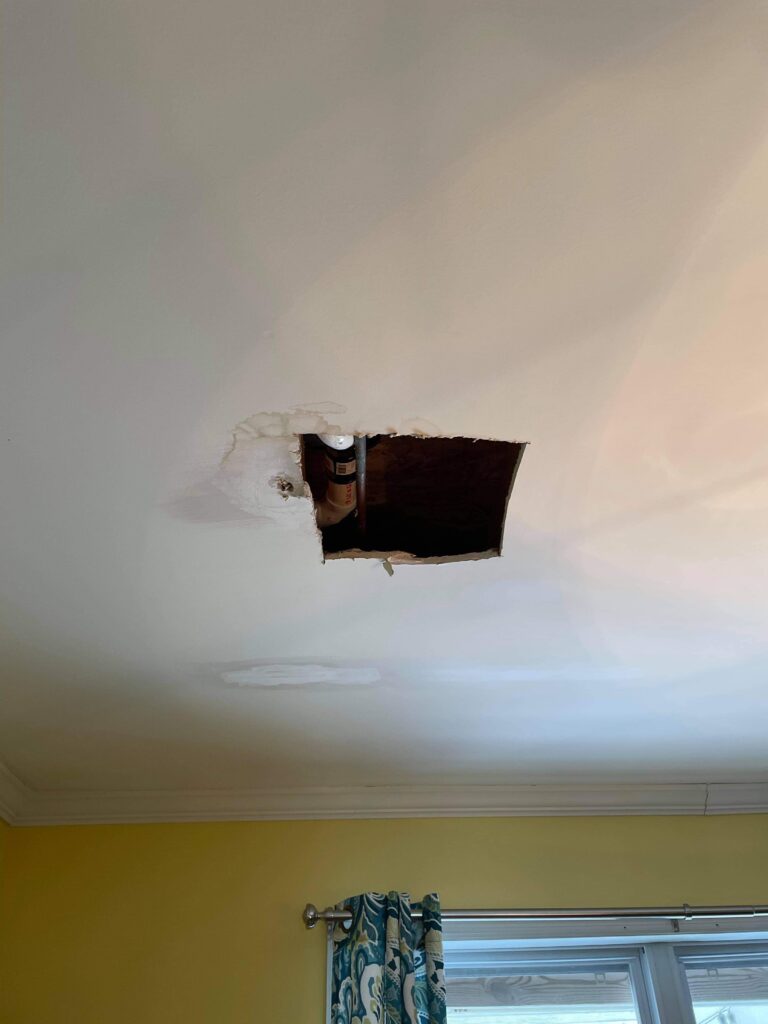
- Cut out the damaged drywall. Use a utility knife or drywall saw to remove the damaged drywall. Be sure to cut at least 6 inches beyond the visible damage in order to ensure that all damaged material is removed.
- Install new drywall. Cut a piece of drywall to fit the hole and secure it in place with drywall screws. Use joint compound to cover the seams and smooth out the surface. Allow the compound to dry completely before sanding and painting.
- Repair any damaged paint or wallpaper. If the water damage has caused paint or wallpaper to peel or bubble, you’ll need to remove the damaged material and apply new paint or wallpaper.
Preventing Future Drywall Ceiling Water Damage
In order to prevent future drywall ceiling water damage, there are several steps you can take:
- Regularly inspect and maintain your plumbing and roof. Look for any signs of leaks or damage and repair them promptly.
- Keep gutters and downspouts clean and in good repair. Clogged gutters can cause water to overflow and cause damage to your ceiling.
- Insulate pipes and appliances that produce steam, such as hot water heaters and boilers. This will help prevent condensation and water damage.
- Install a water alarm. These alarms can alert you to the presence of water, allowing you to address the issue before it causes significant damage.
- Use a dehumidifier in areas prone to excess moisture, such as basements or bathrooms. This can help prevent condensation and water damage.
Dealing with Mold
If the water damage to your drywall ceiling has resulted in mold growth, it’s important to address the issue as soon as possible. Mold can cause health problems and can spread quickly if not dealt with promptly. Here are the steps you can take to remove mold from your drywall ceiling:
- Remove any standing water or moisture. As with the steps for repairing drywall ceiling water damage, it’s important to remove any standing water or excess moisture in order to prevent further mold growth.
- Wear protective gear. When dealing with mold, it’s important to protect yourself by wearing gloves, a mask, and goggles to prevent exposure to mold spores.
- Clean the affected area with a mold-killing solution. There are several products available specifically designed to kill mold, such as bleach or ammonia. Follow the instructions on the product for the best results.
- Dry the affected area thoroughly. Use fans and open windows to help dry out the affected area and prevent further mold growth.
- Repair any damaged drywall. If the mold has caused damage to the drywall, you’ll need to follow the steps for repairing drywall ceiling water damage to replace the affected material.
Hiring a Professional
If the water damage to your drywall ceiling is significant or you’re unsure of how to proceed with the repair, it may be best to hire a professional. A professional can assess the extent of the damage and provide a plan for repairing it, as well as identify any underlying issues that may have caused the damage.
When hiring a professional, be sure to do your research and get multiple estimates. Ask for references and check online reviews to ensure that you’re hiring a reputable and trustworthy company.
Tips for Choosing a Professional
- Look for a company with experience in repairing water damage and drywall.
- Get estimates from multiple companies and compare prices.
- Ask for references and check online reviews.
- Make sure the company carries insurance and is licensed to work in your area.
By following these tips and taking action promptly, you can repair drywall ceiling water damage and prevent future issues. By properly maintaining your home and addressing any problems as they arise, you can protect your investment and enjoy a safe and comfortable living space.
Cost of Repairing Drywall Ceiling Water Damage
The cost of repairing drywall ceiling water damage can vary significantly depending on the extent of the damage and the size of the affected area. Here are some factors that can impact the cost:
- The extent of the damage: The more severe the damage, the more costly the repair will be. If the water damage is limited to a small area, it will likely be less expensive to repair than if the damage is widespread.
- Type of drywall: Different types of drywall have different costs. For example, fire-resistant drywall is more expensive than standard drywall.
- Labor costs: The cost of labor can vary depending on the region and the specific company you hire.
- Additional repairs: If the water damage has caused other issues, such as mold growth or structural damage, these repairs will need to be addressed as well, which can add to the overall cost.
It’s always a good idea to get estimates from multiple professionals in order to get a sense of the potential cost of the repair.
Insurance Coverage
In some cases, your homeowner’s insurance may cover the cost of repairing drywall ceiling water damage. It’s a good idea to review your policy and speak with your insurance agent to determine if the damage is covered. Keep in mind that most insurance policies have exclusions and limitations, so it’s important to understand what is and isn’t covered.
DIY vs. Professional Repair
If you’re considering repairing the drywall ceiling water damage yourself, it’s important to consider the extent of the damage and your own skills and abilities. If the damage is minor and you have experience with drywall repair, a DIY approach may be a good option. However, if the damage is significant or you’re not confident in your ability to complete the repair, it may be best to hire a professional.
In some cases, attempting to repair the damage yourself may actually cause more harm than good. For example, if you’re not able to properly fix the source of the water damage, the problem will likely reoccur. Additionally, if you’re not familiar with mold removal, attempting to remove mold yourself could actually cause the mold to spread or release more spores into the air.
Conclusion
In conclusion, drywall ceiling water damage can be a major headache for homeowners. By following the steps outlined in this article, you can repair the damage and prevent future issues. Whether you choose to tackle the repair yourself or hire a professional, it’s important to address the issue promptly in order to minimize the damage and protect your home.