Drywall Repair How To Guide – Avoid Costly Mistakes
If you’re searching for a drywall repair how to, this is the right place. I’ve been a drywall repair contractor for years now, and today I’ll be sharing different methods to help you learn how to repair drywall.
If you haven’t been to Drywall Central, my name is Joe. I write this blog in between my full-time drywall company. I share my experience, how-to guides, and what not to do when it comes to drywall repair.
Drywall Repair How To – Methods
Now before we get into the detail of the actual work, it’s important that you know there are different methods depending on what you’re repairing. For the sake of making this as simple as possible, I’m compiling it into 3 different general sizes for repair.
The Tiny Drywall Holes – Small Holes or scratches under 1″
The Eye-Catching Drywall Holes – Holes 1″ – 2″ big
The Fist-Sized Drywall Holes – Holes around 3″-10″
The Big Ones – Drywall Holes 10″ – 16″
Drywall Repair How To – The Tiny Ones
Small holes will be the easiest to repair. They do not need a ton of time or effort. In fact, the actual dry time of the product used will take longer than the actual work that you put in.
If you are doing a small drywall repair for nicks or dings on the wall I would recommend using spackle. Spackle is very easy to use for homeowners and it’s pretty cheap.
Spackle is a type of compound, but is more paste-like than joint compound. It resists shrinking, making repairs of small holes quick and effective. Spackle Is a great choice for nicks, dents, dings, and scratches on walls.
If you use an all-purpose joint compound, you must apply a second coat. Due to the longer dry times of joint compound, you would have to wait 24 hours to coat again.
Spackle is a great solution for minor drywall repair because it cuts working time in half compared to joint compound.
How to use spackle:
- Apply the spackle to the hole.
- Smooth it out with a scraper/putty knife.
- Once dry, sand the area.
Drywall repair How To – The Eye-Catching Holes
For this portion, I’m going to be focusing on slightly bigger holes in drywall. If you have a small hole that is 1” to 2”, your easy fix will be to use a self-adhesive mesh tape for the repair. I recommend mesh tape for a few reasons:
- It is self-adhesive so you can apply it to the hole first.
- The grid-like design of mesh tape allows you to fill in the small drywall hole after the mesh has been applied.
Directions for mesh tape on small, 1-2” holes:
1. Apply a small piece of mesh tape, and make sure it is larger than the actual hole.
2. Using a spackle knife/joint knife/taping knife, press the joint compound into the mesh slightly – ensuring it fills the hole.
- Gently smooth the wall to remove any clumps left behind.
- Allow the area to dry for 24 hours.
- Apply another coat of joint compound, this time going wider than the actual patch. This will help it blend into the surface.
- Allow it to dry for 24 hours again, and sand it!
- Repeat step 5 if the area does not look fully blended into the wall.
Drywall Repair How To – Fist-Sized Holes
When you’re repairing larger-sized drywall holes, you will need a spare piece of drywall and some type of backing to screw it into. I’ve actually seen work where others have tried to simply apply a layer over layer of mesh tape to cover a large hole. Save yourself some time on your drywall repair and don’t make that mistake. Mesh tape can only be used to a certain point, after that point, you’ll need to reinforce the patch.
If you’re repairing a larger hole you will need to come up with a type of backing. Using drywall as backing to a drywall patch does not, and will not work – the back piece of drywall will crumble as you screw. This means that the screw you’re placing in the face of the patch will not sink in all the way.
The right way is to use backing with a 1×2 piece of wood, or drywall repair clips. These will be incredibly effective at making a solid drywall patch. The directions on using these follow the same guidelines.
- Set up an easy start first – cut the area to be a square. This will make it easier for the new drywall patch to fit in place.
- Insert drywall repair clips or wood behind the piece of drywall, and screw in from the front to hold it into place.
TIP: If you’re having a hard time screwing the piece of wood in, first insert a screw halfway through the center of the wood. This will give you something to hold onto.
- Once your backing is in place, cut a small piece of drywall to fit the area. Insert the drywall patch into the hole and screw it into the backing from the front.
- Add self-adhesive mesh to the seams
- Apply an all-purpose joint compound (I don’t recommend spackling these) using a joint or taping knife. For the first coat, your main focus is pushing the mud into the seams, so you can mend the bond between the wall and drywall patch. Allow it to dry for 24 hours.
- For the next step, your goal is to apply more joint compound and blend it into the wall. If you do not think you can blend it this time, apply what you can, allow it to dry, and do another coat the next day.
- Once you have effectively blended it into the wall your final step is to lightly sand down the area.
The BIG Ones
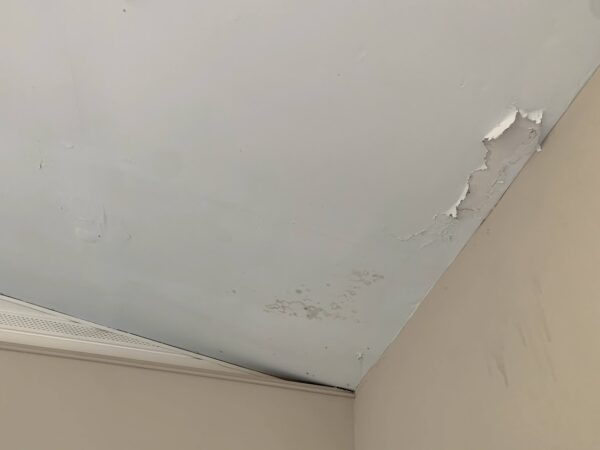
For this drywall repair how to, we are focusing on the big patches. These can be from water damage, accidental falls, or moving furniture. You’ll most likely be able to remove the broken drywall from the wall and see the studs nearby. This is a good thing – because those studs will make your patch much easier!
The first thing you’ll want to do for this drywall repair is cut out the area of broken drywall. You’ll want to make this either rectangular or squared depending on the size. Your goal for this is to set up an easy area to work with. When you begin cutting – do not cut past the stud in the wall. I will always try to get to the halfway point on the stud – which is anywhere from ¾ inches to 1”, it depends on the age of the home. To be safe, just cut the drywall to where you can see only ¾” of the stud on each side.
When you have the hole cut to a square or a rectangle you’re able to begin the patch.
- Measure the hole of your drywall hole and cut a new drywall patch to that size.
- Apply the drywall patch into the hole, and screw drywall screws into the studs on the left and right sides. TIP: If you want this to be a very sturdy and reinforced patch, use a piece of wood or drywall clips in the center of the patch.
- For the sake of keeping this an easy DIY guide, I recommend using mesh tape to tape the drywall patch seams.
- Similar to the previous paragraphs, the first coat’s purpose is to push the joint compound into the seams to bond the wall and patch together. Gently scrape the outside of the patch with your taping/putty knife to remove any excess compound from the wall. Give it 24 hours to dry before continuing to the next step.
- You’ll next start widening the area with the joint compound. This means your joint compound on the wall will go beyond the patch. This step will be much easier with a larger taping knife, such as an 8” or 10” taping knife. Allow the area to dry again for 24 hours.
- For the best possible results to blend the patch into the wall, I go over the patch with a 12” taping knife and joint compound a third time. Though it is a smaller patch, the more you build out and feather around the patch – the better it will be blended. It will be hard to spot once complete. Wait 24 hours again for it to dry.
- The final step to any drywall repair patch is to sand down the area using a fine-grit sanding sponge. I usually go for 180 grit and above. TIP: Use good lighting at all angles while sanding. This will show any imperfections and get you the smoothest results.
What was your result?
I would love to know if this drywall repair how to helped you with your drywall patch. Drywall repairs come in all different sizes. Did this article help you understand the process of repairing drywall better? Please let me know in the comments below!