How To Drywall Corner Bead
Welcome to Drywall Central, your go-to resource for all things drywall! I’m Joe, an experienced drywall professional, and I’m here to guide you through the ins and outs of drywall repairs and installations. Whether you’re tackling a small odd job or embarking on a DIY project, I’m dedicated to providing you with the knowledge you need to succeed. In this comprehensive guide, we’ll delve into the various types of corner bead and walk you through the process of installing and finishing drywall corner bead like a pro.
Types of Drywall Corner Bead
In the world of drywall, corner beads come in a variety of options, each with its unique features and benefits. Below, I’ll cover the top-selling corner bead types, highlighting their quality and pricing advantages.
1. Metal Corner Bead: Versatile and Sturdy
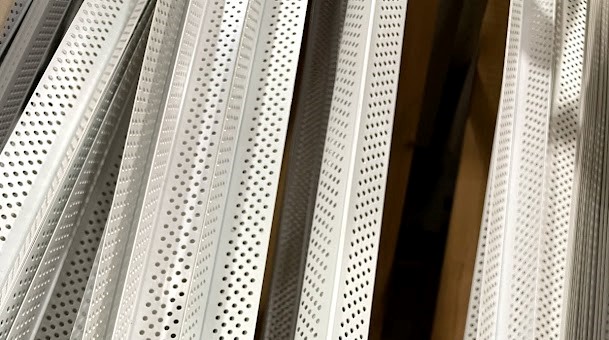
Metal corner bead, constructed from galvanized steel, boasts perforations that facilitate optimal joint compound adhesion. This versatile option is suitable for outside corners where both sides require drywalling. While installation methods include nails, screws, or staples, it’s essential to exercise caution due to the sharp edges and shavings associated with metal cutting.
2. Vinyl Corner Bead: Lightweight and Rust-Proof
Vinyl corner bead, another popular choice, offers perforations for enhanced compound adhesion. This lightweight alternative can be easily installed using staples or nails, making it a breeze to work with. Unlike screws, which might cause outdenting, staples and nails maintain the bead’s flush appearance. Vinyl corner bead is rust-proof and can be effortlessly cut using tin snips, sheetrock knives, or even scissors.
3. Bullnose Corner Bead: Smooth and Rounded
For those seeking a safe and visually appealing option, bullnose corner bead is the answer. Made from thin vinyl, this type shares the same quality and installation steps as other vinyl beads. The term “bullnose” refers to the rounded shape of the outside corner, offering a softer alternative to the traditional 90-degree angle.
4. Vinyl Rip Bead: Tailored for Unique Surfaces
When drywall meets a different wall type, vinyl rip bead, also known as “tear-away bead” or “L-trim,” is your solution. Designed for corners or walls adjoining rock or wood surfaces, this versatile bead type finds its utility in various scenarios, such as edges of fireplaces or beneath window sills. The tear-away strip of the rip bead simplifies sanding preparation, making it a valuable addition to your drywall toolkit.
Installing Drywall Corner Bead
Installing Metal Corner Bead
Tools Needed:
- Measuring Tape
- Tin Snips
- Drill
- Drywall Screws
- Metal Corner Bead (8′ or 10′, depending on corner size)
Step 1: Measure the corner’s length; if it’s precisely 8′, no cutting is required.
Step 2: Use tin snips to cut the metal corner bead to the appropriate length.
Step 3: While holding the bead in place, secure it with drywall screws or other fasteners.
Step 4: Insert screws along each side, spacing them every 10 inches.
Installing Vinyl Corner Bead (Including Bullnose and Tear Away Bead)
Tools Needed:
- Measuring Tape
- Tin Snips/Scissors/Utility Knife
- Staples/Nails (Optional but recommended)
- Corner Bead
Step 1: Cut the vinyl corner bead to match the corner’s size.
Step 2: Hold the vinyl corner in position and secure it with staples or nails.
Step 3: Place staples every 6 inches or nails every 10 inches along the bead.
Tip: Alternatively, you can use spray glue or all-purpose joint compound to hold the bead in place without using staples or nails.
How To Mud Corner Bead
One of the most rewarding phases of corner bead installation is mudding, where you achieve smooth and flat corners. My preferred choice for most jobs is vinyl outside corner bead due to its ease of repair. The corner’s gap is typically around 1/4″, visible when a 10″ taping knife is held against the wall and bead.
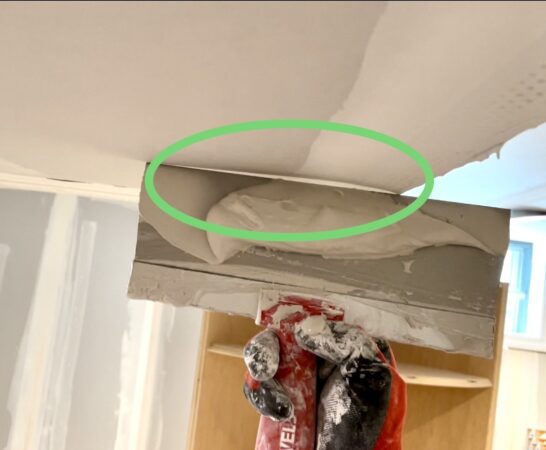
To start, “bed” the corner into all-purpose compound for strong adhesion. Allow the outside corner to dry before proceeding. Next, apply a fast-setting joint compound like USG Easy Sand to fill the gap. Choose the Easy Sand variant based on your expertise level—the number indicates the setting time. Apply the compound, let it cure, and follow up with a final coat of pre-mixed joint compound for an easy-to-sand finish.
Sanding Your Corners
You’re almost there! Before you embark on sanding, ensure proper eye and lung protection. Wear a well-fitted 3M respirator and goggles to safeguard your health. Optimal lighting angles aid in spotting imperfections. Sand the entire corner, mark areas needing touch-ups, and re-sand as needed. Once satisfied, your corners are ready for the finishing touches—paint or any additional embellishments.
Your Feedback Matters!
I’m here to support your drywall journey. If you have questions or feedback, please share them in the comments below. Your success is my priority, and I’m thrilled to be part of your drywall project. Good luck, and remember that even professionals learn and improve over time. You’re doing great!


