How To Drywall A Ceiling
If you’ve never installed drywall on a ceiling before, today I’ll walk you through how to drywall a ceiling. If you’re a DIYer, homeowner, or a general contractor – this guide is for you.
Before you begin installing drywall, it’s important to understand the different types, lengths, and thickness of the drywall. This will save you from having to research which to use.
What Type of Drywall for Ceiling
The type of drywall you use will depend on which room you’re installing in. There are three main types of drywall. Fire resistant, mold resistant, and standard.
Fire resistant drywall should be hung on the ceiling only if there is a separate living space in the above floor. Always check your local code to confirm this!
Mold resistant drywall should be used in high moisture rooms like a bathroom or above a shower.
Standard drywall should be used in any other scenarios.
What Size Drywall For Ceiling?
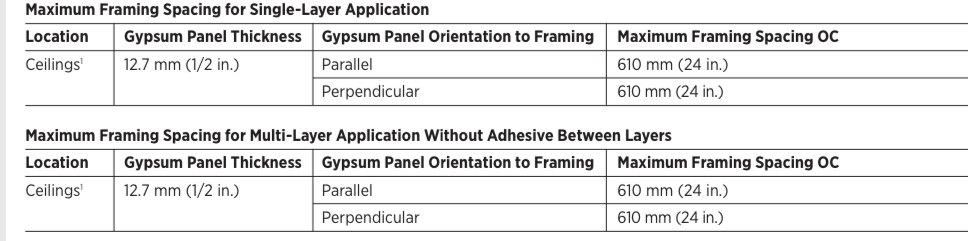
When you drywall a ceiling, you can either use ½” or ⅝” thick drywall. ½” thick drywall is sag resistant up to 24”. If for some reason your joists or studs are further apart than 24”, you should use ⅝” drywall.
Moist joists/studs are 16” on center. If this is the case, you are safe using ½” drywall. The reason many go for the extra thickness is to reduce sag.
Here are the specifications directly from USG:
How Much Drywall For Ceiling
To determine how much drywall you need for the ceiling, you can either measure the square foot or count the studs to determine the amount.
By Square Feet
Square footage is very basic. To determine the square foot of ceiling drywall, you’ll need the length and width of the room then multiply. You can use my free drywall calculator here.
Example: 10ft wall x 12 foot wall = 120 square feet.
An 8’ x 4’ sheet of drywall is 32 square feet.
A 10’ x 4’ sheet of drywall is 40 square feet.
A 12’ x 4’ sheet of drywall is 48 square feet.
Next, you’ll divide the total square feet by the drywall square feet.
120/32 = 3.75 (4) sheets of 8×4 drywall
120/40 = 3 10’ x 4’ sheets of drywall
120/48 = 2.5 (3) sheets of 12’ x 4’ sheets of drywall
By Studs
You can also measure by the studs to determine how much drywall you need for a ceiling. Some drywallers in the trade understand that since most studs are typically 16” on center, they can figure it out by understanding the layout.
For example, if you’re hanging drywall on a ceiling with 16” OC studs and counting from stud to stud each stud means an additional 16”.
Stud 0: 0
Stud 1: 16”
Stud 2: 32”
Stud 3: 48”
Stud 4: 64”
Stud 5: 80”
Stud 6: 96” (One 8 foot sheet fits from stud 0 to 6)
Stud 7: 112” (last stud before you are over 10’ of drywall)
Stud 8: 128”
Stud 9: 144” (One 12 foot sheet fits studs 0-9)
How Many Drywall Screws Per Sheet?
For a 4×8 sheet of drywall, you should use at least 28 drywall screws. Space each screw by 16”. The easiest way to explain this is you’ll have 4 rows of 7 screws on a 4×8 sheet.
On a 4×10 sheet of drywall, you should have roughly 35 screws. Since 16” on center isn’t divisible by 10 feet, this could be more or less.
For a 4×12 sheet of drywall, you will need at minimum 40 drywall screws per sheet.
What Size Screws For ½ or ⅝ Drywall On Ceiling?
Anytime you hang drywall, either on a wall or ceiling, you want to make sure that the screws are driven at least ¾” into the stud.
So, for ½” thick drywall, you should use either 1 ¼” or 1 ⅜” drywall screws.
When hanging ⅝” drywall on a ceiling, you will want either 1 ⅜” or 1 ½” minimum.
Which Way To Hang Drywall?
A lot of drywallers debate this for one reason only – butt seams. A butt seam is where to butt ends of drywall meet. Butt seams are more work for the mudder and taper, which is why some debate it.
However, it’s not a debate when it comes to structural integrity. From the beginning to end of a home being built, everything is staggered, and running perpendicular. So, a stagger = stronger. Running perpendicular to the joists = stronger.
For a video and visual of me explaining the best way to hang drywall, watch it on the link below:
How To Hang Ceiling Drywall By Yourself
As an owner-operated business, I hang ceiling drywall by myself all the time. I’m going to go through the different ways you can too. However, you should know that after doing these methods for a while, I’ve upgraded to a drywall lift.
Hanging Ceiling Drywall Using A Deadman
I’m not exactly sure where the term came from, but a deadman is two 2×4’s screwed together in a T shape. Using a deadman can be tricky because you can only have one per job you do. When you attach the two 2×4’s together, they must meet the ceiling height MINUS the width of the drywall you’re hanging.
The deadman is going to hold the board in place while you adjust and screw in the ceiling drywall. This method requires you to lift the drywall up in place first, then slide the deadman under the board to support it (and save your shoulders).
After using a deadman for a while, it was too much for me having to constantly cut 2×4”s to match the ceilings. So, I got a little creative and came up with a better idea.
A Ratcheting Cargo Bar (for trucks)
These guys I still use to this day, even if I use the lift. I bought four of them to hold the ceiling drywall in place so I can easily and safely screw in the drywall. A ratcheting cargo bar is a telescoping pole with two flat ends and a handle to compress/decompress each end. It’s actually meant for truck cargo to keep things in place. But I found a good use for them in drywall.
This is very close to how the deadman works, except this time you will hold the drywall with one hand and compress the cargo bar to hold it up. Once it’s in place, you’re able to easily screw the drywall in place.
The Best – Drywall Lift
An awesome invention, it saves my shoulders a whole lot. Drywall lifts have a platform, legs, and a pulley system in order to crank drywall to the ceiling and hold it in place. This is hands down the safest way to hang ceiling drywall and from what I’ve personally determined, the most efficient for solo drywallers.
With a drywall lift, you only have to lift the drywall face down onto the platform at about chest height – then you can crank the pulley wheel to where it fits. The bottom legs have locking wheels for safety, but also the unlocked wheels help you easily move the drywall to the right place.
If you decide a drywall lift is your best bet, here is one I recommend from Amazon:
Conclusion
In this article I went over all of the different aspects of what you should know on how to hang ceiling drywall. Did I answer all of your questions? What if anything did I miss? Let me know in the comments below!
All the best from Drywall Central!