How To Remove Popcorn Ceiling: DIY Guide From A Pro
This past week, I had a job for a minor drywall patch and removing their popcorn ceiling a homeowners bathroom. During the entire process, I was thinking – this is easy money for me but, it’s time consuming. How can I teach a homeowner this process in case they want to try saving some money?
So if you’re looking for a guide on removing your popcorn ceiling, today I want to walk you through my steps on removing it. As an added perk, I’m writing up your material list for items you’ll need to get this done!
The DIY Advantage
Removing popcorn ceiling might seem like a daunting task, but with the right approach, it can be a rewarding DIY project. Not only does it give your space a modern and clean look, but it also allows you to control the entire process, ensuring quality and safety.
Materials Needed For Popcorn Ceiling Removal
Before you start the removal process, make sure you have all the necessary materials. Here’s a list to help you prepare:
- Painter’s Plastic, Tape, & Sheetrock Knife
- Garbage Bag/Contractor Bag
- Spray Bottle with Warm Water
- Taping Knife
- Safety Gear (Eyes and Lungs)
- Small Ladder or Workbench
Step 1: Preparing The Room For Popcorn Removal
Materials Used: Painters Plastic, Tape, Knife to Cut Plastic.
You’re going to want to cover your floor first with painters plastic. If you have any furniture in the room, this will be covered second. If possible, move your furniture to another room. This project is a messy one!
Once you have covered your floors properly, you want to work your way up from the floor to the ceiling using the painters plastic. Essentially what you are doing, is making a way to redirect any fallen debris, down to the floor – so it will be an easier clean up for you in the end.
Next, cover any furniture in the room, any tables, and finally you will want to cover your walls as well. Dust and debris will get everywhere, it will also be damp so it’s easy to stick to your wall, or photos and decor on your walls. Place an entire barrier of the room using the plastic, and make a tape line a few inches below where the ceiling and walls meet.
Step 2: Dampen The Ceiling (You don’t need to soak it!)
Materials Used: Spray Bottle + Warm Water
Fill your spray bottle with warm water and lightly mist a small section of the ceiling. Allow the water to soak in for a few minutes. I will typically get up on my ladder/workbench, and spray where I can reach by hand. Then wait a few minutes and begin scraping. If you have two people working on this project, one person can go through and spray the ceiling, while the other begins scraping.
Also ask them to help scraping after, because your shoulders are going to get sore from this!
Step 3: Scrape Off Popcorn Texture
Using your taping knife, gently scrape off the softened popcorn texture. For this step, I usually use a 10″ or a 12″ taping knife to scrape. Here’s a video I took of my process, to show you how easy it is to come off.
Work in small sections, and be patient to avoid damaging the underlying drywall. If there is a rough area, try misting it again. This has been the easiest method for removing popcorn texture. If you plan on painting the ceiling, follow the next steps!
Step 4: Prime and Paint
Before priming – if you notice any problem areas, such as loose drywall tape, or small drywall repairs, it’s important to take care of those first!
Since you have now finished scraping the popcorn texture, you’re going to want to give it a fresh look. The drywall may be a little dark (lost it’s grey color) since the time it was installed, but don’t worry!
The most effective way to prime and paint the ceiling is to use a flat white ceiling paint and primer. You can find these at most big stores, like Home Depot or Lowes. If you’re an amazon shopper, this ceiling paint is a top pick for DIYers. I prefer using a paint and primer in one, because it saves money and you paint less. With a paint and primer, you’ll have to coat the ceiling twice and you’re done.
Step 5: Clean Up and Disposal
The popcorn is ready to be disposed of, and out of your life for good! To clean up the mess, work your way from the ceiling down this time (opposite of how we started). Allow everything to fall to the floor plastic you laid down and roll it all up into a trash bag or large contractor bag.
You may still have a little dust and debris to clean up afterwards, but this is completely normal.
It’s a great chance for a deep cleaned room, with your new & updated ceiling! Congrats on your work and dedication!
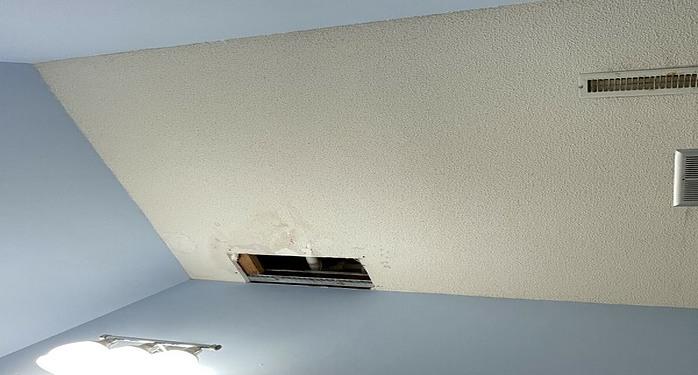
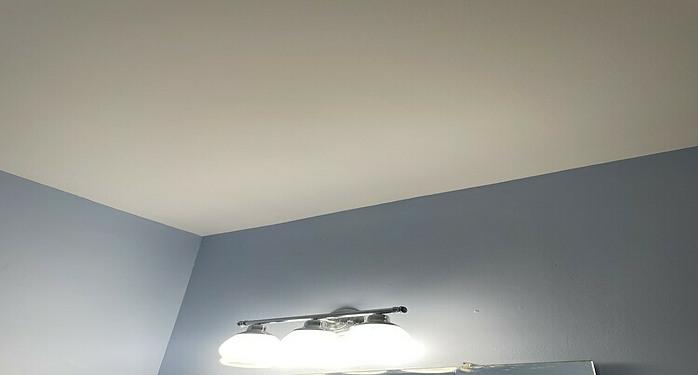
Before And After Popcorn Ceiling Removal Photos
Final Thoughts
Removing popcorn ceiling is a rewarding DIY project that can transform the look and feel of your space. By following these steps and using the right materials, you’ll achieve a smooth and modern ceiling. Remember to take your time, prioritize safety, and enjoy the satisfaction of completing a project that adds value to your home.
In conclusion, don’t let the popcorn ceiling be a source of frustration—turn it into an opportunity to enhance your home with this step-by-step guide. Happy DIYing!